How to allocate more memory to minecraft

Madison Flores
Published May 02, 2026
Step 01: Open CurseForge Launcher and click on the Settings icon located at the bottom left corner of the window. Step 02: Under Game Specifics, which is located on the left bar of the CurseForge, click on Minecraft. It will open the… Step 03: Scroll down to Java Settings. Under Java Settings, …
There are other answers below:
Allocate More RAM in Minecraft Launcher Step 1. Check the available RAM on your PC Right click Windows Start menu and choose Settings. In the setting window, choose System. Locate to the About section and note down the number of Installed RAM under Device specifications. Step 2. Toggle on the JVM arguments switch
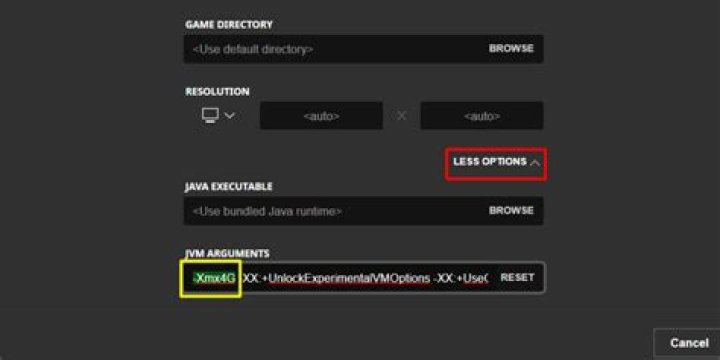
Allocate more RAM. By default, Minecraft will allocate 1 GB of RAM for itself. You can increase this by typing -Xmx#G. Replace # with the number of gigabytes you want to …
1. Launch the CurseForge app. Access “Settings” by clicking the gear icon in the lower left corner of the screen. © Emma… 2. There’s a “Game Specific” section in the column on the left side of the settings page. Select “Minecraft.” 3. Scroll down to “Java Settings” where you’ll see “Allocated …
Open up your CurseForge Launcher. Navigate into Minecraft, and click on the modpack you wish to allocate more memory to. Next to the play button, you should see 3 dots, press them, and select profile options. Uncheck Use system memory settings. Use the slider to set how much memory you want to allocate.
At least 2 GB of RAM is essential for Minecraft, however, 4 GB is advised. You’re in good shape if you have more than that. You can allocate more ram to Minecraft server as it needs to satisfy its requirements. Method 1: Use the Default Launcher to Allocate More RAM to Minecraft server
Follow the steps below to allocate more RAM: Open the Minecraft Launcher. Go to the “Installations” tab. Click the version that you’d like …
Open the Minecraft Launcher and click on “Installations” . Click the three dots icon → edit → more options and “-Xmx2G” from 2 to the gigabytes of ram that you require and press “Save”. 6 …
These are some basic steps on how to allocate more RAM to your game. Step 1 – Open the Launcher. Step 2 – Click the ‘installations’ button Step 3 – Choose the profile you want to allocate more RAM to (e.g. Latest Release) Step 4 – Click the ‘more options’ button Step 5 – You will see alot of text, only concentrate on the first line saying -Xmx2G
Related Questions
How to allocate more RAM to Minecraft?
Allocate more RAM Minecraft 1 Check the available RAM on your PCRight click Windows Start menu and choose Settings.In the setting window,… 2 Toggle on the JVM arguments switchStart the Minecraft Launcher by double-clicking the Minecraft icon on your PC. 3 Adjust RAM for Minecraft See More….
How to increase Minecraft server memory on Windows 10?
Step 1. Check the RAM on your PC Right click Windows Start menu and choose Settings. In the setting window, choose System. Locate to the About section and note down the number of Installed RAM under Device specifications. Step 2. Open Minecraft server directory
How do I change memory allocation in Minecraft Java?
Click the three lines in the top-right corner, then Files, then Settings. CTRL + Comma will direct you to the Settings menu from inside the launcher. Then, in Minecraft, scroll all the way down to the bottom. A pane titled Java Settings will be shown. Find and select the Allocated Memory slider.
How do I allocate more memory to a modpack?
In the top right you should be able to verify that the allocated memory has changed to the number you set. Open up your CurseForge Launcher. Navigate into Minecraft, and click on the modpack you wish to allocate more memory to. Next to the play button, you should see 3 dots, press them, and select profile options.