How to change ram usage in minecraft

James Sullivan
Published May 05, 2026
Locate to the About section and note down the number of Installed RAM under Device specifications. Step 2. Toggle on the JVM arguments switch. Start the Minecraft Launcher by double-clicking the Minecraft icon on your PC. Select the Launch Options tab. Make sure the Advanced settings is turned on. Select the profile you’d like to edit. Make sure that the JVM …
There are other answers below:
MethodTipsWarnings Check your computer’s available RAM. The amount of available RAM will dictate how much memory you can allocate to Minecraft. To check RAM: Windows – Open Start, click the Settings gear, click System, click About, and look at the number next to “Installed RAM”. Mac – Open the Apple menu, click About This Mac, and look at the number to the right of the “Memory” headi…Update your Java program . Go to Java’s website at and …
Click on the Java/Minecraft. It will open the settings related to Minecraft. Under these settings, change the “Maximum Memory/RAM” according to your needs and hit “Save”. It will allocate Minecraft with the memory of your choice to …
To change how much RAM “Minecraft” can use, you’ll have to change the settings of your Minecraft Launcher app. The launcher app is the program you use to launch “Minecraft.”
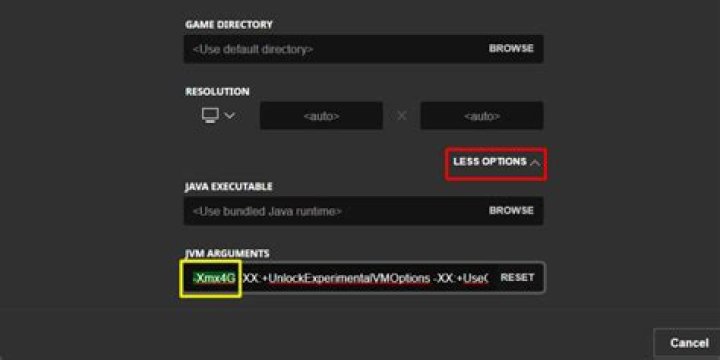
Open Minecraft launcher. Go to the “Installations” tab. Select the version of Minecraft you would like to change the RAM allocation to, and click on the 3 dots and click “Edit”. Click on “More options” on the bottom. Locate “JVM ARGUMENTS” and find “-Xmx2G”. “2G” represents how much RAM is allocated to the client.
This number is how much RAM you have allocated to Minecraft. Change this number to how much RAM you would like in Minecraft for example -Xmx8G” Name and customize your installation how you would like, and then press save. Launch Minecraft using this installation, log into a world, and press F3.
So, if you already have 2GB of RAM allocated to Minecraft, it’ll say “Xmx2G”. To change the amount of RAM, simply replace the number. Save the changes and launch the game.
Replace the value in megabytes of 4096 on both arguments with the available RAM of your machine. For example, you could replace them with 8192M which means 8 GB of RAM allocated on startup to the Minecraft server. A full example with 8GB : java -Xmx8192M -Xms8192M -jar minecraft_server.jar nogui Enjoy!
java -Xmx[RAM in MB]M -Xms[RAM in MB]M -jar [your server file name].jar. 1GB RAM Example: java -Xmx1024M -Xms1024M -jar [your server file name].jar. 2GB RAM Example: java -Xmx2048M -Xms2048M -jar [your server file name].jar. You’ll notice all that’s changed is that we’ve added a few things in the middle of the original command.
Open Minecraft launcher. Go to the “Installations” tab. Select the version of Minecraft you would like to change the RAM allocation to, and click on the 3 dots and click “Edit”.