How to make a realm in minecraft

Madison Flores
Published May 01, 2026
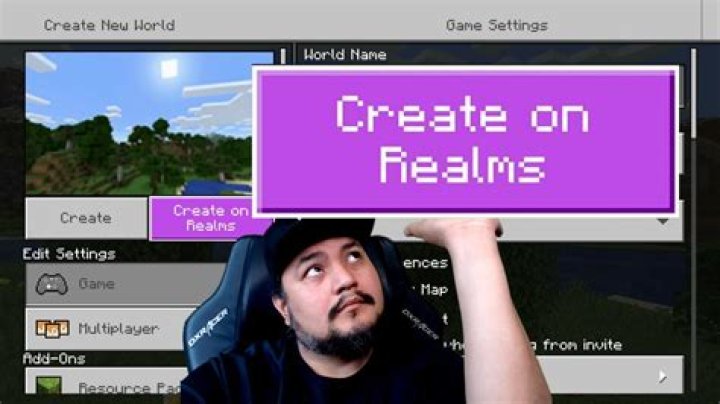
Click the “Create New” button and then the “Create New World” button. Set the world and multiplayer settings to your liking. Once the settings are …
There are other answers below:
How To Create A Realm In Minecraft Java Edition (2021). – YouTube. In this video, I’m showing you guys How To Create A Realm In Minecraft Java Edition.Support My Channel:PayPal: paypal.me …
You get one Realm per subscription, but you can change the game modes and maps for that Realm. After you make a purchase, your Realms subscription starts. After your payment is complete, open Minecraft, select Minecraft Realms, and then choose the option to create and configure your Realm. You’ll see an option to enter a world name or to start with a preexisting …
Select a Realm from the list. If you have not joined any Realms yet, select the Friends tab. Select Join Realm. Enter the Realm invite code you received in the field and select Join. If you play on Bedrock but have no realm to join, you can also choose to join a much-larger server and play with a lot of other people.
You do this by opening the game (obviously), then clicking Play, Create New, and finally New Realm. From here, you create the realm as you would create anything else in Minecraft, taking as long …
Players can enact the following steps to create a Realm in Java Edition: Click on “Minecraft Realms” from the main menu. Tap on the “Buy Realm” button. Players will be redirected to Minecraft.net …
In Minecraft, click Play. Click the Create New button and then click the Create New World button. If you have a Realms Plus subscription, you can also choose a Realms Plus template to load. Click the template you want, then click the Download button, and then click the Create this World! button. Choose the game and multiplayer settings for your new world. After you have …
In Minecraft, select Play. Select the Friends tab and choose Join Realm. If you are playing on console, enter the 6-digit invite code. If you have received a Share Link invitation, the invite code will be the last six digits of the URL. Select Join.
1. Most owners of realms, or friends of the owners, play in creative mode. Sometimes its just fun to play in survival mode! Pretend your a player, see how its like for your players! 2. BUILD! Build to your hearts content! If your not a good builder, theres many great building tutorials on youtube, some even a few hours long! 3. Create your own minigames!
The second method involves actually downloading your Minecraft Realms world to your local PC where you can store it, play it, or both. Advertisement We’ll take a look at both methods but first you’ll need to launch Minecraft, click on “Minecraft Realms” on the main menu, and then click on the configuration wrench seen in the screenshot above.
Related Questions
How do I create a new realm in Minecraft?
To create a new Realm, follow these instructions: In Minecraft, click Play. Click the Create Newbutton and then click the Create New Worldbutton. If you have a Realms Plus subscription, you can also choose a Realms Plus template to load.
How do I set up my realm World?
After you have purchased a Realms or Realms Plus subscription, you will need to set up your Realm world. You can either create a new world, or you can use one of your existing worlds on your Realm. To create a new Realm, follow these instructions: In Minecraft, click Play.
What is a Minecraft realm?
Purchasing and Setting Up a New Bedrock Realm Minecraft Realms are personal multiplayer servers that you can use to play with your friends. Your Minecraft Realm is always online and can always be accessed by you or anyone you invite. There are two different types of Realms subscriptions, Realms and Realms Plus.
How do I download Minecraft Realms on PC?
The second method involves actually downloading your Minecraft Realms world to your local PC where you can store it, play it, or both. We’ll take a look at both methods but first you’ll need to launch Minecraft, click on “Minecraft Realms” on the main menu, and then click on the configuration wrench seen in the screenshot above.